
Harry Potter books and films are a firm favorite for children of all ages, making Harry Potter crafts for kids a great choice of activity. In this article I will be explaining how you can make five different Harry Potter crafts for kids. These Harry Potter crafts are sure to please your kids and keep them busy crafting for hours.

Jump to:
Why Harry Potter crafts are so great for kids
The magical adventure stories of Harry Potter attract children of all ages, making Harry Potter crafts very popular. The Harry Potter theme is great to get little imaginations going. There are so many possibilities when it comes to Harry Potter crafts for kids and I've picked five of my favorite crafts to share with you today. These five easy Harry Potter crafts will delight any young Harry Potter fan.
Top 5 Harry Potter Crafts
The Harry Potter bookmark craft is a simple Harry Potter drawing idea that will make a useful gift for any book fan. What could be better than a Harry Potter-themed bookmark keeping your place in your favorite Harry Potter book?
The next craft I'll show you how to make is a golden snitch with polymer clay. This is one of my favorite Harry Potter crafts as it looks so impressive when finished and can be used as a necklace pendant. You could also make more than one and hang them on strings as DIY Harry Potter room decorations.
For another great craft that will provide hours of playtime fun, I will show you how to make a Harry Potter wand. These colorful wands are easy to make for kids of all ages and look great when finished. You will need to collect small sticks from outside for this Harry Potter craft, providing you with a bonus outdoor adventure.
Next, I’ll show you how to make a simple paper Hedwig owl craft. These cute owls take little time and are so simple and fun to play with that you could have fun making all the owls from the Harry Potter films.
For the last of the Harry Potter crafts in this article, I am going to explain how to make a Harry Potter potion using slime! This is my favorite Harry Potter craft as it involves using Harry Potter magic to make the slime and provides endless imaginative and sensory play value.
5 Harry Potter Crafts for Kids:
How to Make a Harry Potter Bookmark
Materials Needed:

Instructions:

- Cut your cardstock so you have a square.
- Fold two corners down from the top to meet in the middle and form a triangle. Tape these together on the back. It may be easier to lay the tape down sticky side up and then press the corners onto it.
- Cut diagonally down from the triangle on each side to make a diamond shape.
- Color stripes on your diamond shape, using the colors of your favorite Harry Potter house. I have chosen red and yellow stripes to represent Gryffindor for my Harry Potter bookmark.

5.Using your leftover cardstock, cut out the shape of Harry Potter's glasses. You can find 2 circles to draw around to help with this. To cut the center of the circles, fold them in half.

- Cut out a smaller zig-zag shape. This will represent Harry Potter's scar.
- Color your glasses and zig-zag with a black marker and then use your glue stick to stick them to the triangle at the top of your diamond. Be careful not to stick the flap down as, to use the bookmark, you will place the flap over the corner of your book.
- Leave your Harry Potter bookmark craft to dry and then try it out on your favorite Harry Potter book!

Tips and Tricks:
I have colored my Harry Potter bookmark red and yellow to represent Gryffindor. You could use the colors of your favorite Harry Potter house for yours.
For a Harry Potter painting idea, you can use paint instead of markers for this craft, leaving it to dry before sticking on the glasses and zig-zag scar. You could even use different Harry Potter drawing ideas instead of glasses and a scar to decorate your bookmark.
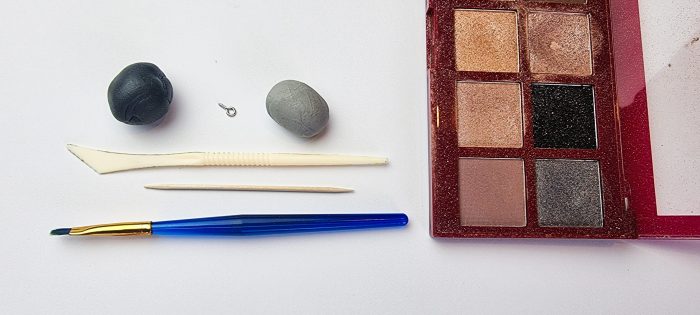
How to make a golden snitch with polymer clay
Materials Needed:
Instructions:
Making the wings
- Start by taking two pieces of gray clay and, using the side of the paintbrush, roll them into thin rectangles.

2. Using your toothpick, draw the shape of golden snitch wings onto the clay. You can use my pictures to see the kind of shape you are aiming for.

3. Use your knife to cut out the shapes and then carefully mark lines on both sides.

4. Bake your wings in the oven for around 10 minutes. You will want to check the instructions on your polymer clay packet to find the temperature as this can differ depending on the make. If you want your golden snitch wings to look more like they are flying then bend them over a rolled up piece of aluminum foil to bake them.

Making the golden snitch body
1. While your wings are baking, take your black clay and set a little to one side. Roll the rest into a ball.
2. Using your tooth pick, make 2 holes in your ball where the wings will go and then set your ball to one side.

3. With a little of your leftover black clay you are going to make 2 small balls. Set these to one side.

4. Next, roll the rest of the clay into a long, thin sausage. Use this to make 4 small circle shapes and 9 small lines.
5. Stick two of the circles onto your ball, placing them around the wing holes you made earlier.

6. Stick the other two circles onto the ball on the opposite side.
7. Stick one line between the wing hole circles. You may need to break it to size as you do so.
8. Stick 4 lines onto each of the opposite circles as stripes. Again you will need to break them to size as you do this.

9. Use your eyeshadow to paint your snitch golden.
10. If you wish to hang your golden snitch on a necklace or cord then poke a metal eye pin into the clay between the wing holes.

Assembling your golden snitch
- Take your pre-baked wings and carefully poke them into the wing holes. You may need to use your tooth pick to adjust the hole size. Stick the small balls at the base of the wings to hold them in.
- Bake your golden snitch for 25-30 minutes and then leave it to cool.

How to make a Harry Potter Wand
Supplies needed:
Sticks collected from the garden or park.

Instructions:
- Break off any excess small branches and dry out your sticks if they are wet.
- Choose a color of polymer clay for your handle and mold it around the end of your stick.

3. Decorate your handle with other colors however you like. You can choose to keep it simple or make more intricate patterns.
4. You can choose to add more polymer clay decorations to your wand if you like. I wrapped clay around my sticks and they turned out looking great.
5. Bake your wands on a baking sheet in the oven for 25-30 minutes at 302 degrees Fahrenheit, and then leave to cool.

Tips and Tricks:
Have fun making lots of different Harry Potter wands. Don't be afraid to experiment with colors. I didn't design mine before I made them, and I think they turned out beautifully.
How to make a paper Hedwig Owl
Materials Needed:

Scissors
Instructions:
- Cut a piece of cardstock in half lengthways and set half to one side.
- Roll the other strip of cardstock to form a tube and stick it together. This will form the body of your Hedwig owl.
- Use your colored markers to draw the shape of a head onto the remaining cardstock and cut it out before drawing two eyes and a beak with a black marker.

4. On a piece of paper, draw the shape of two wings and cut them out. Draw 3 triangle shapes on each of the wings and color them with a black or gray marker.
5. Glue along the top of each wing and stick them on either side of the tube body.

6. Stick Hedwig's head onto the front of the tube body at the top.

Tips and Tricks:
If you can't find cardstock then paper will also work for the Hedwig owl craft. You could use different colored cardstock or paper to make Hedwig's friends and make a whole collection of Harry Potter owls. It is also possible to make smaller or bigger owls by varying the size of your paper.
For more amazing paper craft ideas for kids check out these easy Father's day handprint crafts and these amazing tissue paper crafts.
How to make a Harry Potter potion using slime
Materials Needed:

1 cup PVA glue
Elmers magical liquid activator solution
Glue stick
A bowl and a spoon to mix
Instructions:
- Tip one cup of PVA glue into a bowl.
- Slowly stir some food coloring into the glue until you get the color you want.

3. Add as much glitter as you like and stir it in.
4. Add a big tablespoon of baking soda and mix everything together well.
5. Now it's time for the magic! Being careful not to get any on your hands, add 5 squirts of activator solution to your mixture and keep stirring until the mixture changes to slime.
6. Last but not the least, once slime starts to form, pour away any excess liquid and knead the slime until it is fully mixed.

7. Fill your potion pots with slime and put on the lids.
8. Cut labels out of paper and decorate them with your colored markers. Surely you can get more creative than me with your potion names - maybe choose some from the Harry Potter potions and spells. Stick your labels on to your potion pots.

Tips & Tricks
I have made red and blue slime for my Harry Potter potions. Try making more than one color of slime and experiment with glitter to make your potions look more authentic.
To make this craft more fun and imaginative, you could say magic words as you mix your ingredients and watch them turn to slime. We suggest you wear plastic gloves to make your Harry Potter slime and play with it, both for safety reasons and to avoid coloring your hands.
For the Harry Potter potion bottles I have used plastic screw top containers. You might choose to use more authentic looking glass jars as your potion jars.
Happy Crafting!
Also check out this cute little Tapestry Crochet Space Invader craft from a fellow blogger!

FAQs
What should I do if my slime breaks when I try to stretch it?
Try using less activator solution.
How long will my slime last?
Your Harry Potter potion using slime will last a week or two in the jar.
What if I can't find any gold eyeshadow for the golden snitch?
Although the black clay and gold eyeshadow make an authentic looking gold, you could use yellow clay instead.
What if my Harry Potter bookmark is too big for the corner of my book?
Try starting with a smaller square of paper. If you end up with a bookmark that is too big, you could cut the bottom off so you have just a triangle that opens, then stand it up as a Harry Potter room decoration.
What if my Hedwig owl body comes apart?
If your glue isn't strong enough to hold your tube together then you could always tape it together and turn the taped side to the back when sticking on the wings and head.
How do I dry my sticks if they are wet?
You could place your sticks near a heater indoors, or outside in the sun to dry. Alternatively, you could pop them in the oven on a very low heat, keeping a close eye on them.
What if the wings fall off my golden snitch when it is baking?
After your golden snitch has cooled, you can use a strong glue to stick the wings back on.
Leave a Reply