
If you are a DIY enthusiast like me, then you know how satisfying it feels to create a new product out of old materials.
For those who do not know how to sew, you’d be thrilled to learn that this rag quilt project does not need any sewing—just a lot of patience and creativity. You can even use this as a weekend activity that you can do with your kids!
Ready to learn how to make a rag quilt without sewing? Let's get started!

Choosing Fabric for your Rag Quilt
Rag quilts have exposed seams and a frayed look. Those are the two most common trademarks of a rag quilt. For that reason, you would need to choose a fabric that will fray after each washing. The more it's frayed, the softer the rag quilt is.
The first thing that we need to do is select the kind of material we want to use. Do you want the softness of fleece or flannel? Perhaps you’d like the more popular cotton fabric? You can also use a combination of both materials.
There are different kinds of fabric that you can choose for your project. There is no right or wrong choice. You have to be creative in choosing the designs of the material so you get an impressive combination of your finished rag quilt. You can even customize the design of the rag quilt if you plan to give it to someone special.
For this tutorial, I used a few different colors and patterns of anti-pill fleece.
I mean, how could I resist this adorable whale pattern?!

(You may notice I started out with more fabrics than I actually used. Once I got home, I realized the light blue wasn’t a very good match after all. But hey, we crafters are flexible like that, right?)
Speaking of the cute whale fabric, here are the rest of the supplies you’ll need.
Supplies Needed for a No Sew Quilt
Please note that the fabric sizes listed here are for a 48” x 40” blanket. This is a good size for a small lap blanket. I’ll also give you instructions later on about how to calculate fabric for whatever size blanket you’d like to make.
For the fabric:
- Backing Fabric (52” x 44”) -this can just be extra fabric, no special material needed
- A mix of fabrics for the patches on the front. You’ll need enough to make thirty 12” squares total.
It’s always best to get a little extra because sometimes the fabric shifts on the bolt and it ends up being cut on a bit of a diagonal. Better safe than sorry!
For the supplies:
How to Make a No Sew Rag Quilt
Now, this is a simple project, but it’s a bit tedious. Luckily it’s easy to do when you’re only sort-of paying attention. So I want to throw in an unofficial step zero, which would be grabbing something to drink and picking out a Netflix show!
Step One: Cutting and Arranging the Fabric
Using your rotary cutter, acrylic ruler, and cutting mat, cut each pattern of fabric for the front into 12” squares.

I always wait to cut the backing until the end in case something changes or my measurements weren’t very accurate.
But that’s the beauty of the new sew rag quilt! Your cuts can be wobbly or crooked, but because of the construction, you’ll never be able to tell once it’s done!

So now that the front pieces are all cut, arrange them to your liking and set the pieces off to the side in order.

Or just pull random pieces and make the arrangement up as you go along! Who cares? It’s a rag quilt!
Step Two: Cutting and Tying the Front of the Quilt
Now that everything’s in place, it’s time to start tying.
You are going to be doing this one row at a time, and then attaching all the rows together afterward.
For each row, start by lining up the first two blocks, with right sides together.
Cut a 2” square from two adjacent corners, and then cut 2” long strips in between.

The strips don’t have to be a specific width, as long as you cut both layers together. I like to do about ¾” for fleece. It’s thin enough to tie easily, but wide enough that it’s not going to just fall apart if you pull too hard.
The reason I don’t recommend cutting the strips and corners ahead of time is just that it’s much easier to match them up this way, and a lot quicker than if you had to measure each strip before you cut it.

Now tie each strip in a double knot with its counterpart on the other fabric. Once the first side is done, it should look like this.

Grab the next square third square in that row, and match it up with the second one, again, right sides together, and repeat the process.
Cut corners. Cut strips. Tie strips.

Do this all the way to the end of the row.

Once you have two or more rows done, you can start attaching two rows together at a time using the same method.

But this time, you’re only cutting the squares out of the corner on each end. Not in between the patches.

Cut strips and double knot them together all the way down the row.

I like to cut my strips one square at a time, but that’s up to you.
Keep making and attaching rows of patches until you’ve finished the front of the quilt.
Step Three: Attaching the Back of Your Rag Quilt
I know that this is going to come as a big shock to you, but to attach the back of the quilt, all you have to do is lay the top and bottom pieces together, cut out strips, and tie them.
This time, since you are attaching all four sides, you’ll want to make sure the wrong sides are together.
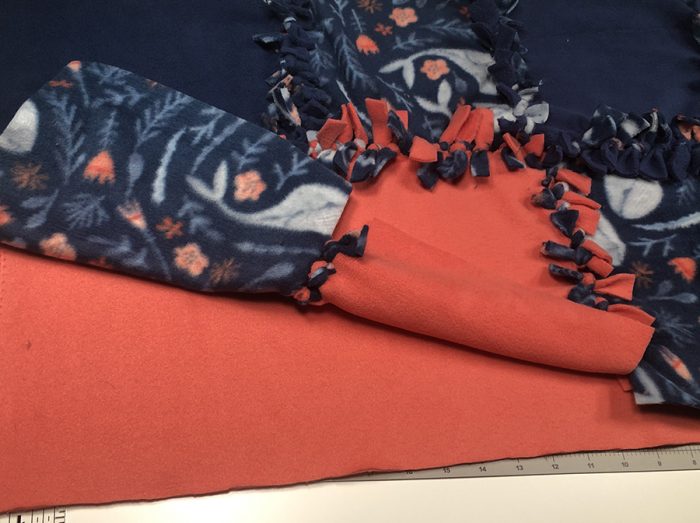
This is the point where you want to cut your backing to size if you haven’t done so already. For my backing, I'm using an extra big piece of the coral colored fabric.
Then, one side at a time, cut out a 2” x 2” square from the corner

Cut your strips and tie the outside of the quilt top to the backing.
When you get to a new corner, you will need to cut out another square like this.

Then, once you round the corner to start tying the next side, you won’t be cutting a square. Just cut the strips so that they are even with the last know on the previous side.

Work like this the rest of the way around the blanket.
All done! You now have a “new” rag quilt without sewing anything! Now bundle up in that thing...you definitely earned it.
How to Calculate Fabric Yardage for Any Sized Rag Quilt
You may have noticed that the fabric dimensions I gave you earlier for this quilt didn't quite match up. Thirty square feet of top fabric for only about thirteen square feet of backing?
That’s because we are essentially creating a 2” seam allowance on every side of every patch of quilt. Meaning you’ll cut each patch to 12” x 12”, but once it’s all put together, each square will only measure 8” x 8”
It might seem like a daunting task to come up with your own yardage when there’s so much overlap, but it’s really quite easy.
Below are the instructions for how you do it.
Step 1: Decide on Finished Quilt and Patch Size
First, decide what size you want your finished quilt. Let’s use 64” x 72” as an example.
Now, we know we want 8” finished squares. That means this rag quilt will be made of 8 rows of 9 squares.
We also know that each side of each square has a “seam allowance” on every side of 2”. Double the 2”, since it’s on both sides and you get 4” extra for tying knots. Therefore, each square needs to start out at 12” x 12”
Use this method to find the yardage for any sized patch:
Finished patch size + 2(seam allowance) = starting patch size.
And now to calculate the size of the backing, we will treat it like one giant patch of your fabric. So the take the finished size of the quilt and add twice the seam allowance to both dimensions. In this case, a 64” x 72” quilt would need a fabric backing of 68” x 76”.
Step 2: Calculate how much fabric you need for each pattern
The hardest part is determining the yardage of each different fabric on the front. You’ll have to know the width of the fabric you’re using, and how many patches of each pattern you are going to use.
I like to use a main fabric for half, and split the rest of the patches between the other complimentary fabrics. So in this case, we’d want 36 squares in the main fabric, and 18 squares each of two other fabrics.
Now for some more calculations. Still easy once you get the idea, I promise!
Divide the width of your fabric by the width of one patch and round down. So, for example, a 62” width fleece would make five 12” squares with a couple inches leftover.
Divide the total number of squares in that pattern by the number of full squares you can get out of the width. Round up if necessary. So, 36 squares divided by 5 full squares in the width, equals 7.2.
This means you’ll need enough to make 8 rows of squares. That comes out to 96” of fabric.
Repeat this for each fabric you’re getting for the front, and you’re done. Go enjoy your fabric shopping!
How to Care for Your New Quilt
Your rag quilt will last a long time if you know how to care for them the right way. Below are some tips and regular rules on how to do it properly to make sure that it will last for years:
- Machine wash in either cold or warm water using mild laundry detergent.
- Do not use bleach on your rag quilt.
- Use medium heat when you tumble dry your quilt, especially if it’s fleece fabric.
- Clean the lint trap of your washer and dryer before washing your rag quilt.
- It is normal to see some fraying on your rag quilt after washing. The frayed edges will add softness to your quilt and it’s meant to look like that.
- You can also use dryer sheets in place of fabric conditioner for those with sensitive skins
Enjoying your quilt
That concludes another DIY idea you can try in your own homes. Wasn’t that easy?! You now have an idea on how to make a rag quilt even if you don’t know anything about sewing. Just follow the steps we have shared with you and add some creativity, and you will have an impressive-looking rag quilt.
Also, know that you do not need to spend on fabric for this project. You can use old clothes or unused material. The more random fabric design you use, the more unique your rag quilt is.
Judy Tiziani
I absolutely love this idea! But I'm just a little confused as to whether the knots are on the outside or the inside. Do you have a completed quilt I could see perhaps?
I also found the instructions a little confusing but am hopeful it will make sense once I start.
Thank you
Judy
Neha
The Knots are on the inside, I am sorry we do not have a completed picture for this article as it's a very old tutorial on our site, but needless to say its one of our most loved No Sew ideas. I hope this help!
Miss Sue
Here it is almost October and I need the up dated directions, I have about 12 adults going to try this project October
Jenny
Hi Miss Sue! We updated the instructions a year ago. Is there a step in particular you need help with? Let me know!
Am
Hi! These instructions are fairly clear except for one thing: when you place right sides together, in the end don’t your knots all end up on the inside, between the top and backing? In some pics it looks like the knots show on the finished quilt, and in others they do not, just the “seams”. What am I missing? Should the knots show, or no?
Morgan
I came across this postr as I was looking for a craft activity for a mental health hospital in the UK where access to sharps is limited. The patients absolutely loved this, although they were initially skeptical about being able to make a blanket without sewing so a big thumbs up and thank-you from us!
Jenny Melrose
Oh my goodness what a wonderful compliment- thank you so much! Please let me know if there's other things they'd like to learn how to make and I'd be happy to post some content for that.
Tammy
I think your instructions were very clear, guess some people just need to complain, if they were being helpful they would have at least said thank you also. Some people and to correct your typing or spelling was just signs of an jerk. Because she knew what you meant so why say anything jerk. Thank you so much for taking the time to give the instructions. So very much.
Jenny Melrose
Thanks Tammy! In all fairness to the readers, I just put a lot of work into revamping this article and making the instructions clearer. I hope your quilt turned out great. Post a pic!
Norman
Well, I am glad I read all the other comments before attempting to make this no (or new sew) sew quilt because I found it confusing as well. I hope to see the new version soon with a clear and conscise instruction video.
Linda
I agree with the above comments. I look forward to seeing how this quilt is put together.
Martha E Sáinz
Yes! This is lovely and would like to try it but... with no images is hard to follow.
Caroline Larsen
I also find the directions confusing. Maybe a video? Or pictures for each step? I would like to do this project. Help please. Thank you..
Jenny Melrose
Thank you Caroline. We are working on updating it to incorporate this feedback. Stay tuned!
Brenda
A video would be great for this project...I don't fully understand the directions
I would love to make this quilt
I think it would be very nice... hope you decide to make a video
Jenny
we will try to do one soon!
Sandra Silver
This no sew quilt is a great idea. However, it would have been better if there were pictures to illustrate the procedure, which sounds a little complicated.
Also, to 'lay out' the fabrics, is two words. A 'layout' is a noun and you want the verb.
Jenny Melrose
Dear Sandra, Thanks for your feedback. I will try to change the post as soon as I can. Best, Jenny
Wanda
Diagrams would be incredibly helpful for the rag quilt. I found the directions rather confusing. The quilt shown just before step three adds a truckload of confusion to your directions. It is a beautiful quilt but I think it has absolutely nothing to do with the directions for the rag quilt. A picture of a rag quilt would be immensely helpful.
Jenny Melrose
Thank you- I'm going to work on updating this.