
Hello, it's Kati again, coming to visit from Houseful of Handmade. Now don't get mad at me, I have a Halloween craft for you today. I know it's only September, but if I don't start now, I'll never get all the fun stuff I want to do for Halloween done.

I seriously love Halloween so much. I love the costumes, trick-or-treating, and most of all, scary decorations. I don't like scary movies or spiders (oh man, I hate real spiders so much), but I sure do love to decorate my house in spooky décor, weird I know. But if you're ready for Halloween, I have a fun wreath for you today, a spooky, spider-covered, Halloween Spider Web wreath!
How to make Halloween Spider Web Wreath
If you've visited my blog, you'll know that I love wreaths. They are such a fun way to add some instant decor that all your guests see as soon as they arrive. And I use wreaths inside the house to decorate too. But what I hate, is expensive wreath forms. I can't stand to spend $10+ on a form that is just going to be covered (or mostly covered), so I like to get creative with my wreaths.

I have a lot of scrap wood, and it is perfect for creating an easy to build wooden wreath form. And if you use scraps, it's free! If not, you will need just over 48" of 1x3 boards and and 8' 1x3 is only $2 so it's still really cheap. You will need one of these basic forms to make the wreath today, and you can see how I easily put one together with only a few tools here.

Once you have your wooden wreath form built and sanded, you will need to paint. I wanted it to be a little worn out looking (cause it's Halloween), so I put on only 1 coat of black paint. It was a little streaky and that is perfect. When it was dried, I sanded down the edges and a few other spots with a sanding brick to give it an even more worn out look. You have to have it all worn out looking if the spiders are making webs on it, right?

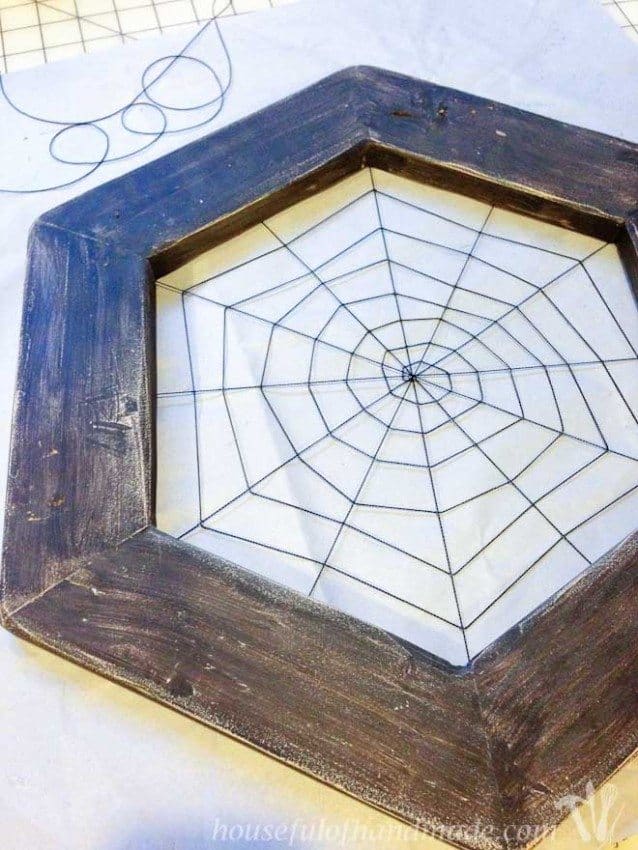
Then it was time to add the web. This is by far my favorite part (okay, I really like the fuzzy spiders I found too). I flipped the wreath over and grabbed my trusty light-duty staple gun and hot glue gun. I used a thin nylon or polyester string. I don't know exactly what it is, I bought it years ago at a quilt shop. It has lasted forever for lots of little projects. Any small black string will work, you could even use yarn but it will have a different look to it.
Tie a knot in the end of the string and then staple that to the wreath. I started at a corner (are they called corners if they aren't 90 degrees?).

Then pull it straight across the center of the wreath to the opposite corner. Staple it down. Go half way between the corners, and staple again. Then pull across to the opposite side half way between the corners.

Keep going all the way around until you have stings connecting all the corners and centers of the boards. Do not cut your string!

Now pull the string from the last spot that you stapled toward the line next to it. I pulled it to about 1" inside the wooden wreath frame. Then I put a tiny dot of hot glue down and held the string in place until it cooled and hardened.

Now continue around the wreath, glueing down the string about 1" away from the previous string or wooden frame. I purposely made the string go closer and farther so it zigzagged around the web. I think it's more realistic, and has more character, that way.

I glued the string down to every string until I got close to the center and they were so close together. Then I skipped one here and there. Again, doesn't have to be perfect, it's a spider web! When I got to the center I cut the string and glued it down into the center.
Seriously, don't you just love it! For someone who has serious arachnophobia, I sure do love this web 🙂
Now it's time to add the burlap ruffle. I cut a strip of burlap twice the length of the circumference of the wreath, and if you don't want to do math and geometry, my strip was about 100" and 10" wide. It doesn't have to be perfect, if you have a shorter strip of burlap, it will be a less ruffly ruffle, if it's longer there will be more ruffles.
Then I sewed the burlap together at the ends so it was a circle of burlap.

Then I sewed the long side together, with right sides out. I used my serger cause it's easy and handy, but you can use a regular sewing machine, or skip his part all together. It just made it easier to work in the next step.

Now using my light-duty stapler again, I stapled the ruffle to the back of the wreath form. To make sure it was even all around I folded the burlap in half and then stapled each end of that to opposite sides of the wreath. Then I found the center of each half and stapled that in the center of the side of the wreath. Then in half one more time. With the excess I just made some underfoot gathers and stapled them down. They are ruffles so they don't have to be perfect (I seem to be saying that a lot, but this wreath is very forgiving that way).

Now turn it over and it's time for spiders. I found the fuzzy spiders I used at Savers. They are in their new Halloween decor. They are about twice the size of the spider on a spider ring. I was originally planning on using spider rings until I found them. Any spider will do.

I forgot to get a picture of putting the spiders on the wreath, but I'm sure you can figure it out. I just hot glued them down! I decided I wanted one hanging from the web and so I hot glued a spider to the end of a piece of string and then stapled the string onto the back of the wooden wreath frame where I wanted it. Easy peasy!
And to hang it I stapled a section of ¾" thick ribbon to the top to make a hook. Now I just need to wait a little bit so I can get it up on the door (I have to give my wheat wreath more time on the door, I just put it up).

For now I will just have to work on more fun Halloween projects to get my Halloween fix.

But you better believe I will put this up starting October 1st!

If you're not quite ready to decorate for Halloween, I have lots of fun fall décor for you.
Check out these easy and amazing Pumpkin Crafts!
And if you need more wreaths, how about an Easter Wreath?
Happy almost Halloween 🙂
Carole
That wreath is really cute! Thanks for sharing. 🙂